HP構築の備忘録.
- Hugoを使った静的サイトジェネレータによるホームページの作成.
- GitHub Actionsを使ったCI/CD.
- GitHub Pagesを使ったWebサイト公開.
の手順をメモする.
Hugoをlocalにインストールする
1brew install hugo
HugoのGitリポジトリ作成
最終的にGitHubActionを使ってCI/CDを構築したいので、最初からGitHub上にリポジトリを作成. HugoのWebサイト構築は作成したリモートリポジトリをCloneして、そのディレクトリで作業する. リポジトリの作成方法-> 公式docs
リモートリポジトリをcloneして作業ディレクトリを用意する.
1git clone git@github.com:JohnYKiyo/HugoHomePage.git
Hugo プロジェクトを作成
homepage下にhugo projectを作成することにした. (HugoHomePage/homepage)
1cd HugoHomePage
2mkdir homepage
3hugo new site ./homepage -f json
ウェブサイトのテーマで自分に合ったサイトを探す.
テーマはHugo Themesで公開されているので、この中から選ぶ。 テンプレのサイトに記載の通りにthemes直下にテーマをクローン(submodule add)する.
1git submodule add https://github.com/roninro/hugo-theme-puppet.git homepage/themes/puppet
その後は、configファイルにthemeの適用を記述する.
1# homepage/config.yamlの中身.
2
3baseURL: 'http://localhost:1313'
4title: Yu Kiyokawa
5theme: puppet
memo:
puppet は, fontの変更をassets/css/custom.cssを設定することで変更可能. config.yaml に変更を記載.
 1# homepage/config.yaml
 2params:
 3  author: Yu Kiyokawa
 4  description: 備忘録とJob description
 5  keywords: 'blog, job description, personal'
 6  img_home: img/home-bg.webp
 7  img_404: img/internet_404_page_not_found.webp
 8  useFaviconGenerator: true
 9  custom_js: []
10  custom_css:
11    - css/custom.css
1# homepage/assets/css/custom.css
2@import url(http://fonts.googleapis.com/earlyaccess/notosansjp.css);
3input, select, textarea, body, h1, h2, h3, h4, h5, h6, .navbar-custom {
4  font-family: 'Noto Sans JP', sans-serif;
5}
記事の更新の仕方.
ディレクトリ構造
主に使用するディレクトリは3つ.
assets, content, static.
assetsはcssを変更する際に使用する.
基本的にcontent, staticしか使わない.
markdown の書き方は、themes/puppet/exampleSite/contents/posts/ のマークダウンファイルを参考に記事にタグをつけたりしながらposts下に増やしていく.
 1homepage
 2├assets
 3├content
 4│ ├about
 5│ │  └ _index.md
 6│ ├archive
 7│ │  └ _index.md
 8│ ├posts # 任意のディレクトリを追加して整理できる.
 9│ │  ├ _index.md
10│ │  └blog
11│ ├series # ここは使用しない. config.yamlで無効化.
12│ └ _index.md
13└static
14  └img # サイトで使用するイメージはここの下に置く.
HPをlocalで確認する
1cd homepage
2hugo server
GitHub ActionでCI/CD GitHub Pagesで公開.
HugoのプロジェクトをGithubで更新管理し、GitHub Pagesで公開する.
Hugoのプロジェクトが入ったGitリポジトリとHugoによってビルドされたHTML一式を別のGitリポジトリにデプロイする. つまりHugoプロジェクト一式とビルドで生成されたWebサイト本体を別々のリポジトリとする構成.
1. GitHubリポジトリ作成.
HugoプロジェクトのリポジトリとWebサイト本体のリポジトリを作成する.
GitHubのページよりHugoHomePage, johnykiyo.github.ioという名前のリポジトリを作成. 今回は初手からHugoHomePageを作成していたので、johnykiyo.github.ioだけ作成.
2. Deploy用の認証鍵を登録.
HugoHomePage リポジトリ から johnykiyo.github.io リポジトリ へ Hugoでビルドしたコンテンツ一式をデプロイする際にSSH認証鍵が必要.秘密鍵と公開鍵をそれぞれのリポジトリに登録する.
- localで認証鍵を作成
1ssh-keygen -t rsa
作成したid_rsa.pub(公開鍵) ,id_rsa(秘密鍵)を, 公開鍵の方はjohnykiyo.github.ioの方へ, 秘密鍵の方はHugoHomePageリポジトリへ, 登録する.
- 秘密鍵をHugoHomePageのリポジトリへ登録する.
公式ドキュメント
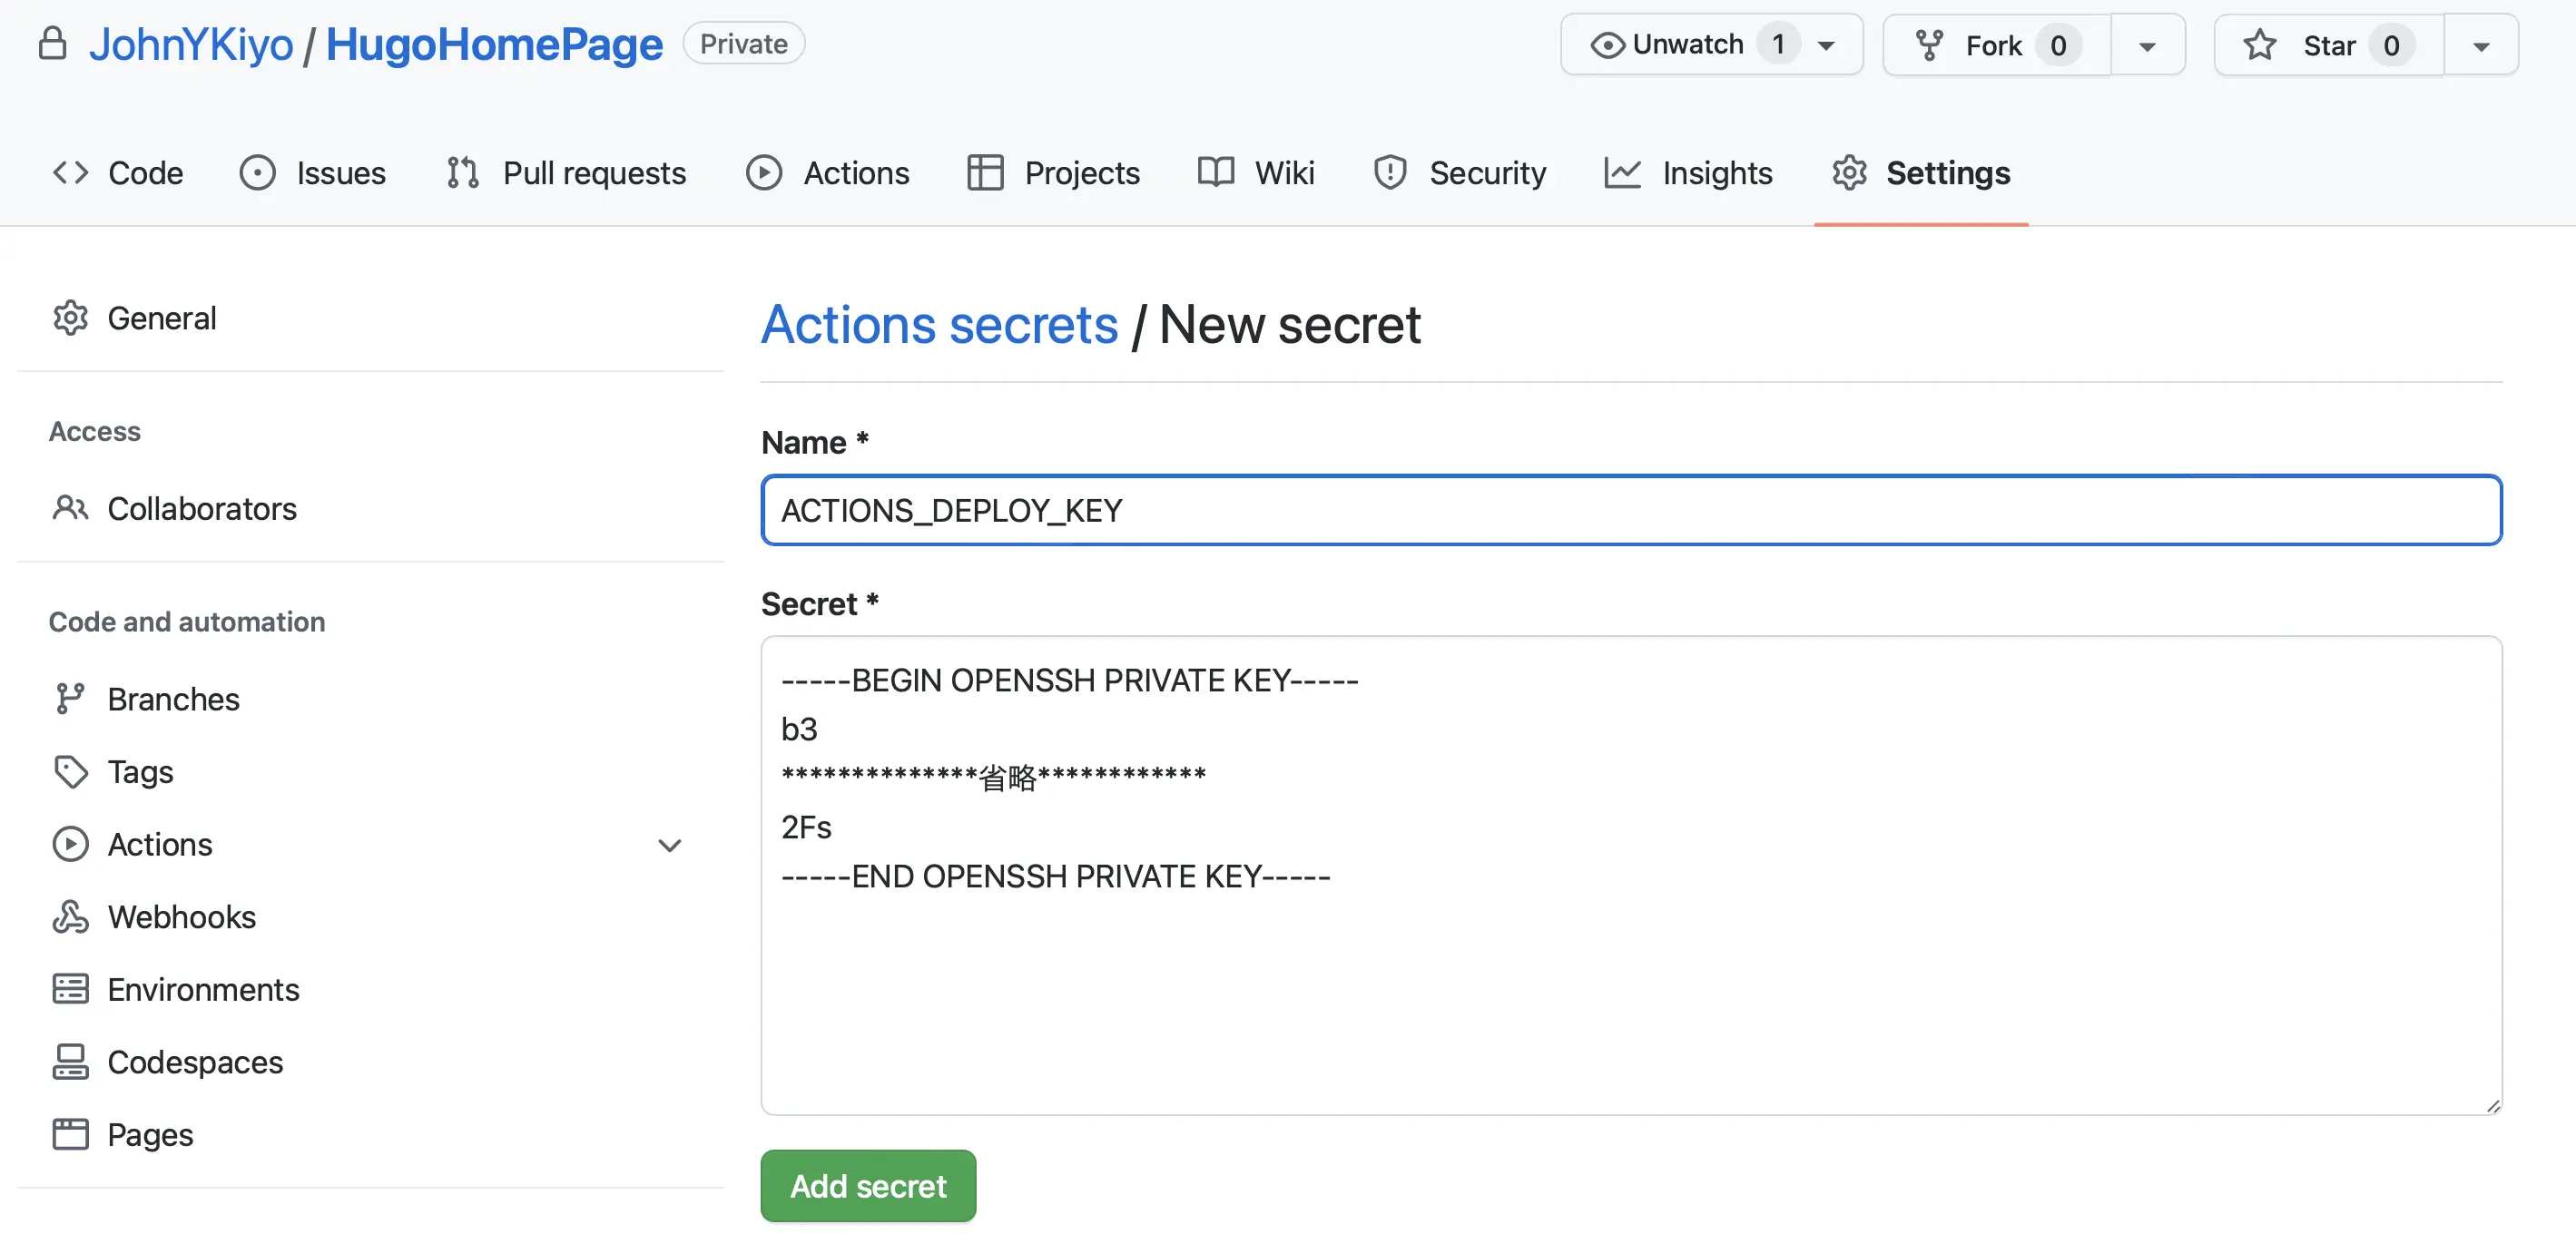
id_rsaの中身をHugoHomePage > Settings > Secrets > Actions へ登録. (画像1).
Name * は
ACTIONS_DEPLOY_KEY
という名前を入力し,Secrets * は 秘密鍵の中身を入力する.
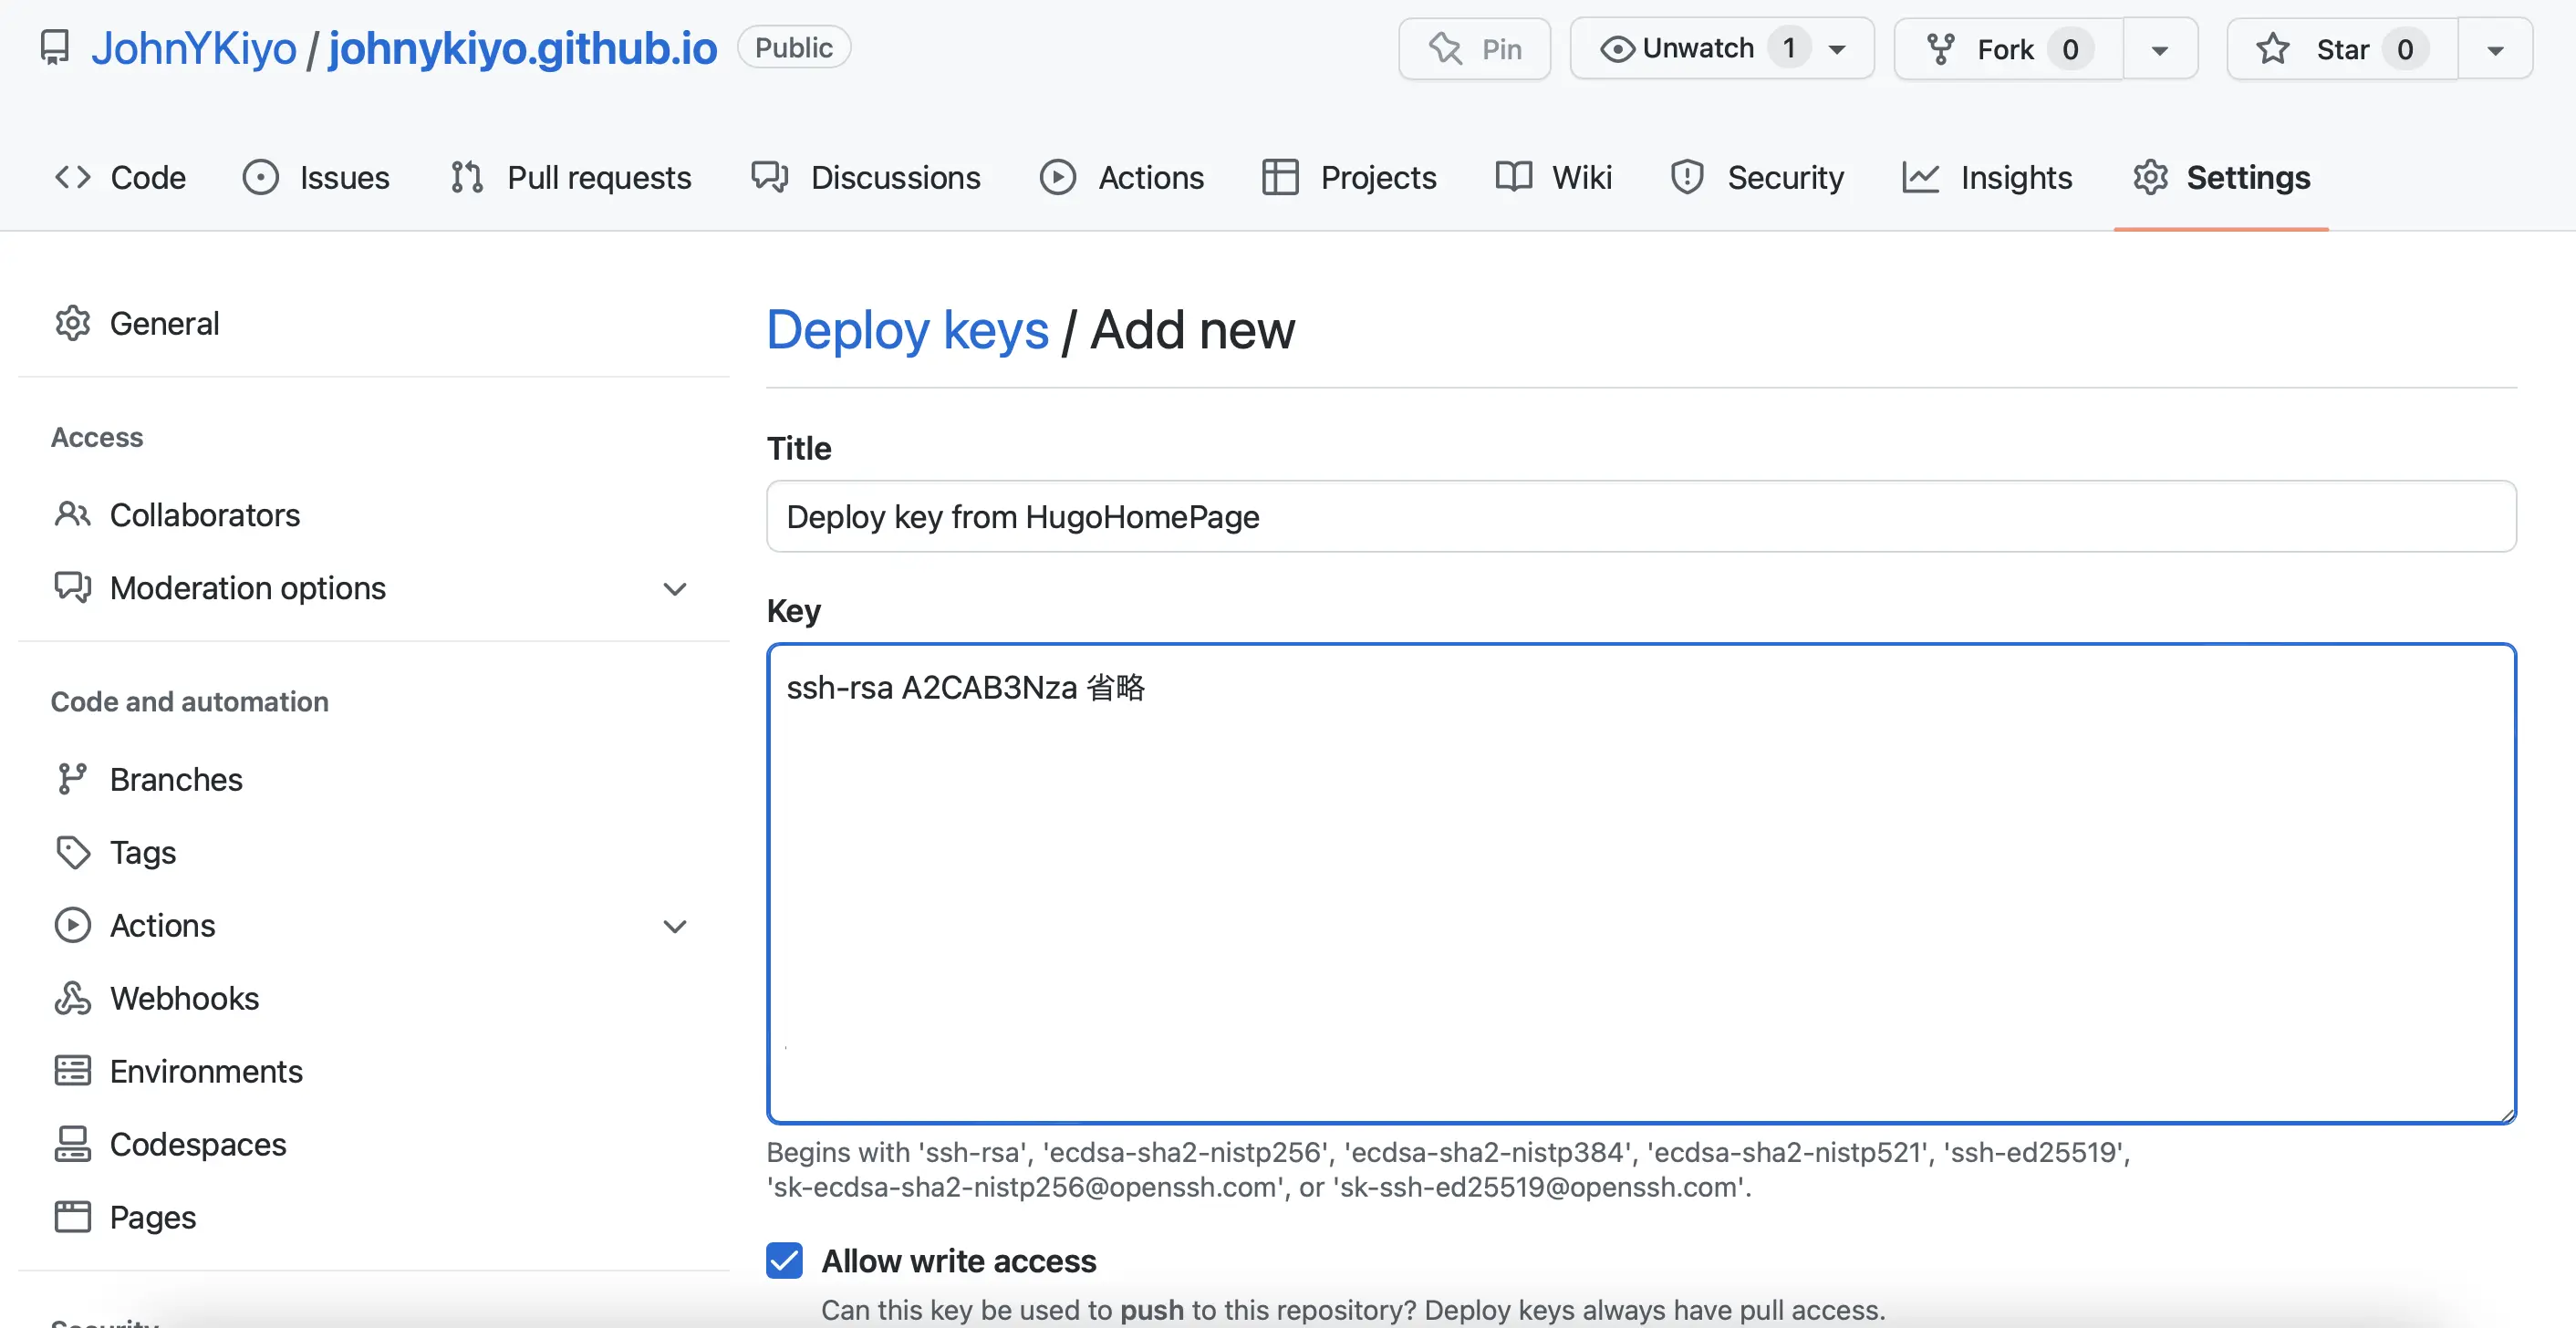
- 公開鍵をjohnykiyo.github.ioリポジトリへ登録する.
公式ドキュメント
id_rsa.pubの中身をjohnykiyo.github.io > Settings > Deploy keys へ登録. (画像2).
3. Github Actions を HugoHomePageで作成.
使用するActionsはこちらを使用した.
GitHub Actionsに以下のyamlを追加.
 1name: GitHub Pages
 2
 3on:
 4  push:
 5    branches:
 6      - main  # Set a branch to deploy
 7  pull_request:
 8
 9jobs:
10  deploy:
11    runs-on: ubuntu-22.04
12    concurrency:
13      group: ${{ github.workflow }}-${{ github.ref }}
14    steps:
15      - uses: actions/checkout@v3
16        with:
17          submodules: true  # Fetch Hugo themes (true OR recursive)
18          fetch-depth: 0    # Fetch all history for .GitInfo and .Lastmod
19
20      - name: Setup Hugo
21        uses: peaceiris/actions-hugo@v2
22        with:
23          hugo-version: 'latest'
24          extended: true
25
26      - name: Build
27        working-directory: ./homepage
28        run: hugo --minify
29
30      - name: Deploy
31        uses: peaceiris/actions-gh-pages@v3
32        with:
33          deploy_key: ${{ secrets.ACTIONS_DEPLOY_KEY }}
34          external_repository: JohnYKiyo/johnykiyo.github.io
35          publish_branch: main
36          publish_dir: ./homepage/public
GitHub Pages用の設定.
GitHub Pagesでサイトを公開するために、Hugoのconfig.yamlを以下のように編集する.
1#baseURL: 'http://localhost:1313'
2baseURL: 'https://johnykiyo.github.io/'
次に、GitHub Pagesの設定. johnykiyo.github.io > Settings > Pages で
Build and deployment
Source
をGitHub Actionsに変更すれば公開されます.
以上で、Hugoを使ったHomePageの立ち上げと GitHub Actions + GitHub Pagesを使ったCI/CD構築の手順をまとめました.

